Deploying a Secure Web Application with Azure Bicep Language
Written on
Chapter 1: Introduction
This guide aims to assist you in deploying an Azure App Service web application within a highly controlled network setting, enforced by stringent inbound and outbound network regulations through the use of Bicep Language.
Azure Bicep is a specialized domain-specific language (DSL) that employs a declarative syntax for provisioning Azure resources. It serves as an abstraction layer over Azure Resource Manager (ARM) templates, enabling the definition of Azure resources using Infrastructure as Code principles.
Prerequisites
To get started, you will need the following:
- An active Azure account (you can sign up for a free account).
- A resource group in your Azure subscription.
- Access to the source code for this deployment, which can be found here:
Solution Overview
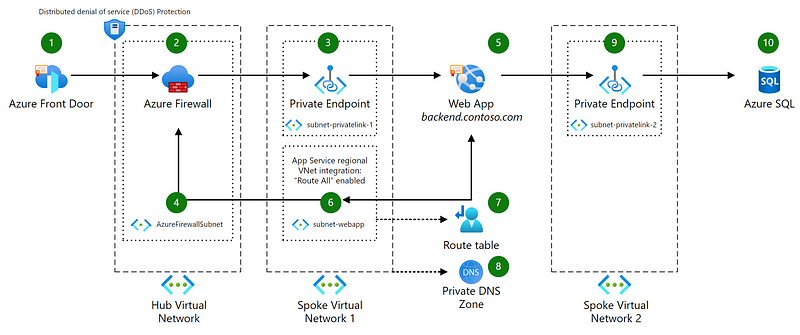
We will create a Bicep template that provisions the following resources:

The resources to be deployed include:
- A virtual network featuring three subnets: Azure Firewall Subnet, Subnet-PrivateLink, Subnet-WebApp.
- An Azure App Service.
- An Azure App Service Plan.
- An Azure Firewall.
- A FrontDoor instance.
- SQL Server.
- A Route Table.
- Private Endpoints.
- A Network Security Group.
For additional potential use cases of this architecture, visit:
The solution will consist of the following files:
- main.bicep: The primary Bicep template.
- azuredeploy.parameters.json: A parameters file containing deployment values for your Bicep template.
- modules: A folder containing Bicep modules for the deployment.
Next, we will examine the main.bicep file. For additional Bicep modules, please refer to the GitHub repository.
Chapter 2: Azure Bicep Template — Parameters
Begin by creating a new file in your working directory named main.bicep. In this file, we will define the following parameters:
param suffix string = 'azinsider'
param usePreviewFeatures bool = true
// Virtual Network
param virtualNetworkName string = 'vnet-${suffix}'
param addressSpace string = '10.235.235.0/24'
param firewallSubnet string = '10.235.235.0/26'
param privateLinkSubnet string = '10.235.235.64/27'
param webAppSubnet string = '10.235.235.96/27'
// Network Security Group
param nsgName string = 'nsg${suffix}'
// Azure Firewall
param firewallIpName string = 'firewallip${suffix}'
param firewallName string = 'firewall${suffix}'
// Web App
param webAppName string = 'webapp${suffix}'
// App Service Plan
param appServicePlanName string = 'appsp${suffix}'
param appServicePlanSku string = 'S1'
param appServicePlanSkuCode string = 'S'
param workerSize int = 0
param workerSizeId int = 0
// Front Door
param frontDoorName string = 'frontdoor${suffix}'
param customBackendFqdn string
// SQL
param sqlName string = 'sql${suffix}'
param sqlAdministratorLogin string = 'sql${suffix}admin'
@secure()
param sqladministratorLoginPassword string
// Route Table name
param routeTableName string = 'routetable${suffix}'
Chapter 3: Azure Bicep Template — Resources
We will define the following resources within the Bicep file:
module nsgDeployment './modules/nsg.bicep' = if(usePreviewFeatures){
name: 'nsgDeployment'
params: {
nsgName: nsgName
securityRules: [
{
ruleName: 'Allow-Firewall'
description: 'Allow Firewall subnet'
access: 'Allow'
protocol: '*'
direction: 'Inbound'
priority: 100
sourceAddressPrefix: '10.235.235.0/26'
sourcePortRange: '*'
destinationAddressPrefix: '10.235.235.64/27'
destinationPortRange: '*'
}
]
}
}
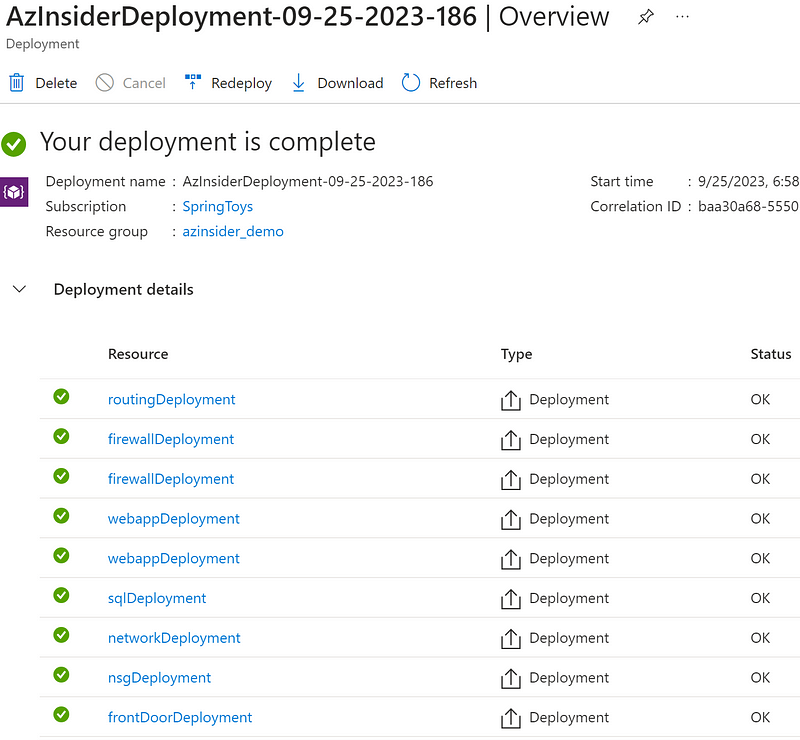
Other resource modules include network deployment, web app deployment, firewall deployment, front door deployment, SQL deployment, and routing deployment. These modules will be set up to depend on one another for a cohesive deployment.
You can explore these modules in detail on the GitHub repository.
Chapter 4: Parameters File
Next, create a new file called azuredeploy.parameters.json with the following content:
{
"contentVersion": "1.0.0.0",
"parameters": {
"customBackendFqdn": {
"value": "azinsiderbackend.com"},
"sqladministratorLoginPassword": {
"value": "azureuser@123"}
}
}
Chapter 5: Azure Bicep Template — Deployment
To deploy your Bicep template, use the command below:
# Command to deploy Bicep template
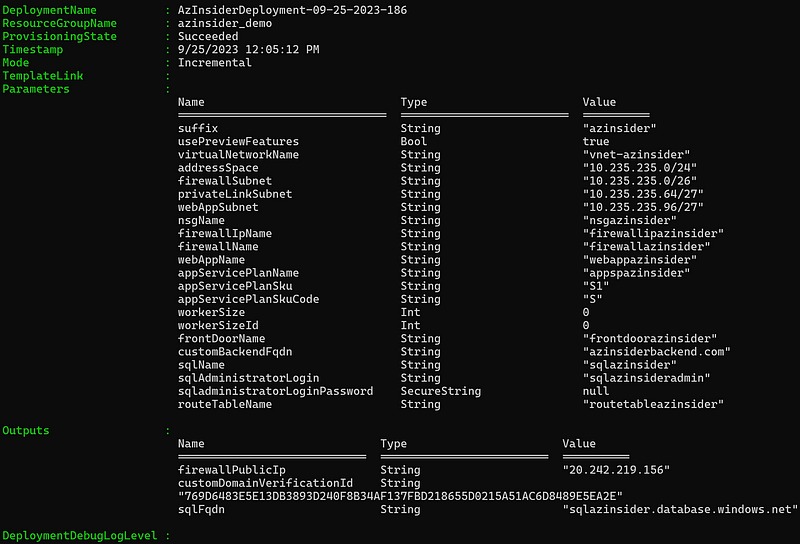
The deployment output will be displayed below:

You can verify the successful deployment in the Azure Portal.

For contributions or further information, visit:
Chapter 6: Additional Learning Resources
This video demonstrates how to build a virtual network using Bicep, providing a step-by-step guide.
In this video, learn how to create a VNet and subnet using Azure Bicep, enhancing your understanding of network deployment.