Spring Boot 3 Crash Course: A Beginner's Guide to Development
Written on
Chapter 1: Introduction to Spring Boot
Spring Boot is an influential framework designed for developing Java-based applications that are ready for production with minimal complexity. Whether you're an experienced Java developer or new to programming, Spring Boot simplifies the process of crafting powerful, scalable, and maintainable applications.
In this tutorial series, I will guide you through the essentials of Spring Boot. By the end, you'll have a strong foundation in Spring Boot development, empowering you to create your own Java applications with confidence.
This first segment focuses on equipping you with the fundamental skills and tools necessary for embarking on your Spring Boot development journey.
Prerequisites:
Make sure you have a solid understanding of basic Java concepts, particularly Object-Oriented Programming (OOP). Familiarity with some API fundamentals will be beneficial, but you can learn those concepts as we progress.
What is Spring?
Before diving in, it's crucial to understand what Spring is, as Spring Boot is simply a streamlined version of the Spring Framework, aimed at simplifying the creation of production-ready Spring applications.
Spring is a widely adopted open-source Java application framework in the software development sector. It operates on two key principles: Dependency Injection and Inversion of Control (IoC).
Dependency Injection (DI):
Dependency Injection is a design pattern that involves supplying a class with its dependencies from an external source rather than creating them internally. Spring enables this by allowing developers to define how classes relate to their dependencies, which are then injected at runtime, promoting loosely coupled code.
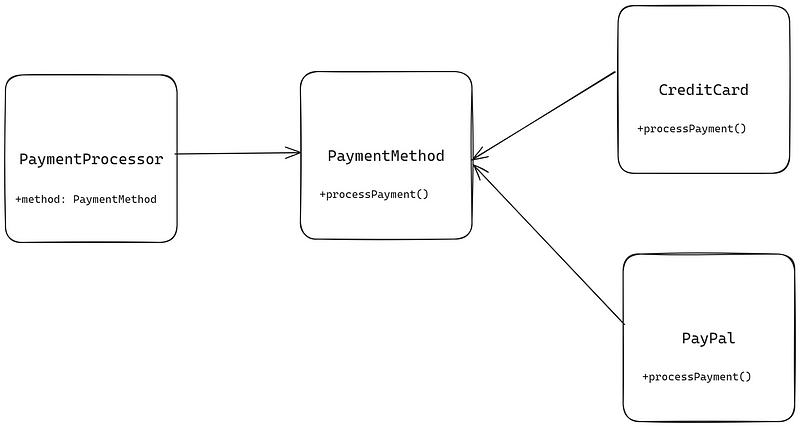
In this illustration, the "PaymentProcessor" class relies on the "PaymentMethod" interface, which outlines the contract for various payment methods. Classes such as "CreditCardPayment" and "PayPalPayment" implement this interface, providing specific payment processing methods. The Spring container manages the configuration and injection of the selected payment method into the "PaymentProcessor" class during execution.
In Spring, dependency injection can be configured through XML files or Java annotations.
Inversion of Control (IoC):
IoC is a design principle that reverses the control flow in a system. Instead of the application directing the flow of the program, the control is handed over to a framework or container, like Spring.
In traditional programming, classes often manage the creation and oversight of their dependencies. However, Spring assumes this responsibility, which is why it is known as IoC.
With IoC, Spring takes charge of creating, configuring, and injecting dependencies, allowing developers to concentrate on the core logic and functionality of the application.
A Brief History
Prior to Spring's introduction, Java 2 Enterprise Edition (J2EE) dominated the enterprise development landscape. However, J2EE faced challenges like complex Enterprise Java Beans (EJB), extensive boilerplate code, inadequate unit testing support, and heavyweight applications due to rigid configuration requirements.
In 2002, Rod Johnson proposed a framework that would alleviate these challenges. Initially named Interface21, it evolved into an open-source framework known as Spring, officially launched in 2003. It quickly gained traction as a more efficient and user-friendly alternative to J2EE.
In 2014, the Spring Boot project emerged to simplify the creation of standalone, production-ready Spring applications. Fast forward to 2022, and Spring 6.0 was released, marking a significant overhaul of the core framework by adopting Jakarta EE9 as a baseline and incorporating new features from Java 17.
What are Beans?
Beans are essential components in the Spring framework that represent objects managed by the Spring container. These objects are created, configured, and supervised by Spring, serving as the foundation of a Spring application.
In simple terms, beans are Java objects created and maintained by the Spring Framework during runtime.
Why Choose Spring Boot and What Will We Build?
Spring Boot allows for rapid setup and configuration of Spring projects. It offers project templates, embedded web servers, and pre-configured dependencies, enabling you to jump straight into coding.
Spring Boot is particularly suited for developing microservices, including RESTful web services and complete web applications. It simplifies web application development by providing embedded servers like Tomcat, Jetty, and Undertow.
Getting Started
Let's create a basic Hello-World API using Spring Boot.
Step 1: Set Up Your Development Environment
Before starting, ensure you have Java and a Java IDE (e.g., Eclipse, IntelliJ IDEA, or Visual Studio Code) installed. You can even use a simple text editor to begin. Additionally, you will need Maven or Gradle for managing dependencies, but for this example, we will utilize the Maven binary that Spring Boot generates during project creation.
Step 2: Create a New Spring Boot Project
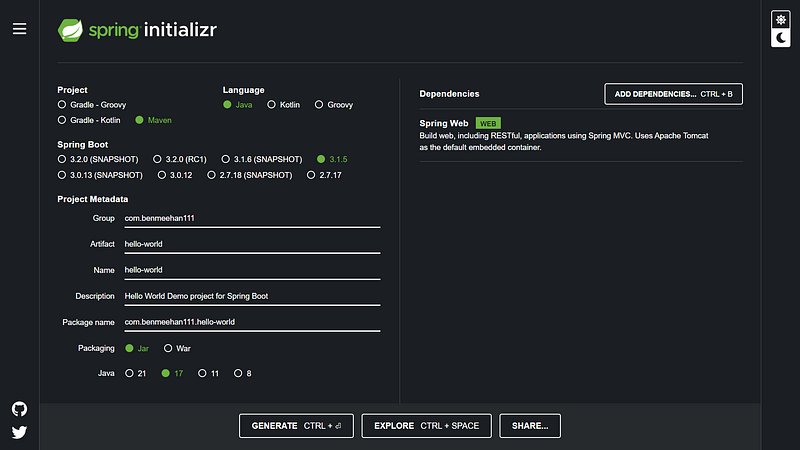
You can create a new Spring Boot project using the Spring Initializr web tool or your IDE. Here's how to use Spring Initializr:
- Configure your project settings:
- Project: Maven Project
- Language: Java
- Spring Boot: 3.1.5 (select the latest stable version)
- Group: com.example (or any group ID of your choice)
- Artifact: helloworld (or any name you prefer)
- Packaging: Jar
- Java: 17 or higher
- Dependencies: Add Spring-Web as a dependency
- Click the "Generate" button to download a ZIP file containing your project structure.
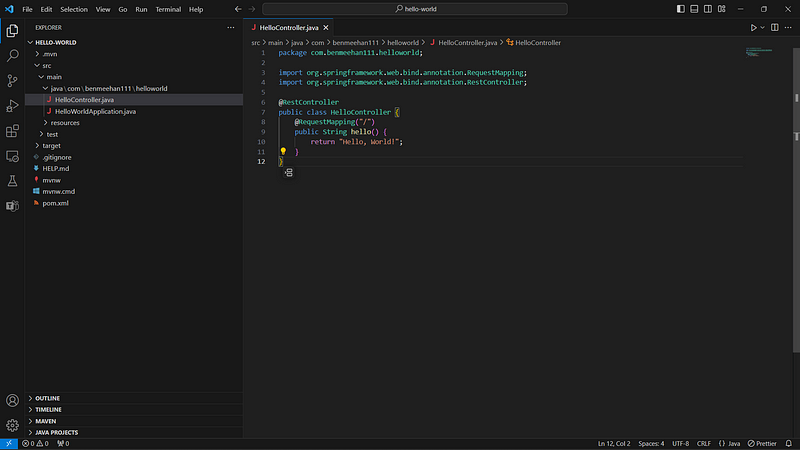
Step 3: Open the Project in Your IDE
Extract the downloaded ZIP file and open the project in your chosen IDE. For this example, I'll use VS Code.

Step 4: Create a "Hello, World!" Controller
In the src/main/java/com/example/helloworld package, create a new Java class named HelloController.java and add the following code:
package com.example.helloworld;
import org.springframework.web.bind.annotation.RequestMapping;
import org.springframework.web.bind.annotation.RestController;
@RestController
public class HelloController {
@RequestMapping("/")
public String hello() {
return "Hello, World!";}
}
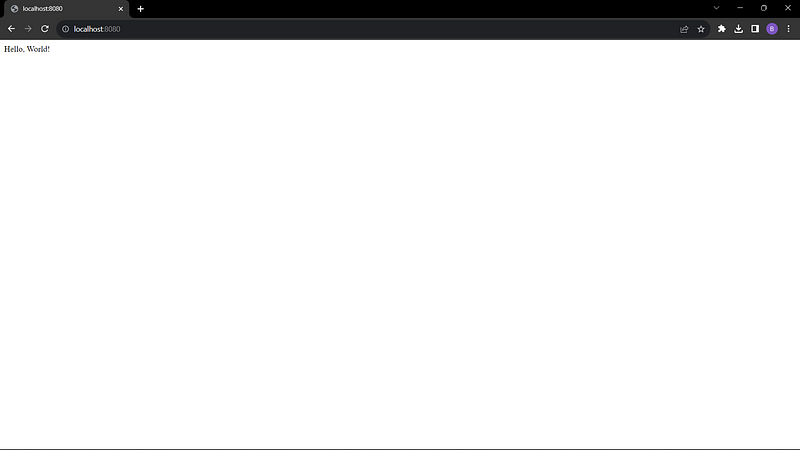
Step 5: Build and Run the Application
Open a terminal, navigate to the root directory of your project, and execute the following command:
./mvnw spring-boot:run
For Windows, use mvnw.cmd instead of ./mvnw.
Once the application is running, open a web browser or use a tool like cURL to access the application at http://localhost:8080/. You should see "Hello, World!" displayed on the page.
We’ve successfully created an API by merely adding two annotations, @RestController and @RequestMapping, to our code. Spring Boot managed the rest for us. To summarize, the @RestController annotation indicates that this class contains methods that will be executed when a request is made to a specified path.
Don’t worry, we’ll explore the Spring-Web dependency and these annotations in more detail in future parts.
Before concluding this section, let's discuss two optional but significant dependencies offered by Spring Boot that can enhance our workflow: Spring Developer Tools and Spring Actuator.
Spring DevTools Dependency:
Typically, when you modify Java code, you need to stop your Spring Boot server (using Ctrl+C) and restart it to see the changes. With DevTools, any code changes are automatically detected by the server without requiring a restart. Spring Boot uses two classloaders: one for stable classes (such as third-party libraries) and another for application code through the RestartClassLoader. When you make code alterations, only the RestartClassLoader is reloaded, resulting in faster restarts.
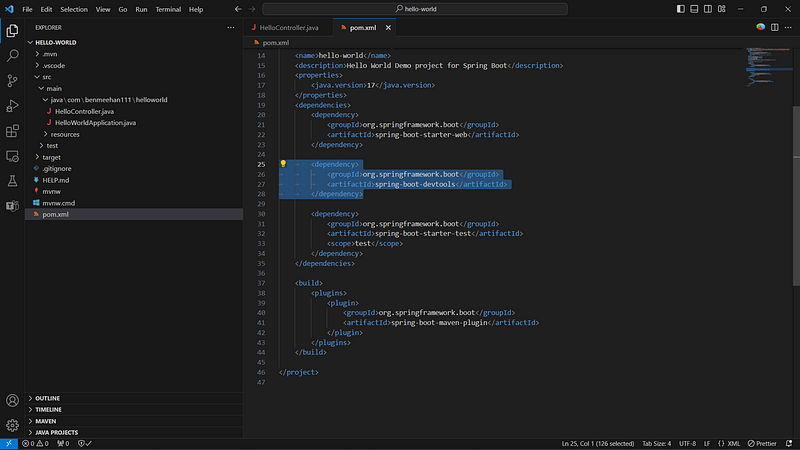
To enable these features, add the Spring Boot DevTools dependency to your project's pom.xml file:
<dependency>
<groupId>org.springframework.boot</groupId>
<artifactId>spring-boot-devtools</artifactId>
</dependency>
Now, when you run your server again, try changing the "Hello World" string in the return statement to something like your name. The server should automatically reload upon saving.
Spring Boot Actuator Dependency:
Spring Boot Actuator provides a suite of production-ready features for monitoring and managing your Spring Boot application. It offers various built-in endpoints to gather information and statistics about your application's runtime behavior.
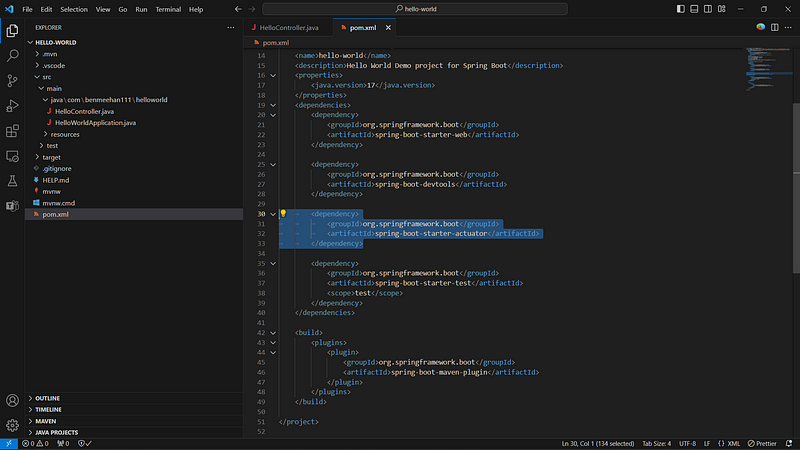
To enable Spring Boot Actuator in your project, simply add the Actuator dependency in your pom.xml file:
<dependency>
<groupId>org.springframework.boot</groupId>
<artifactId>spring-boot-starter-actuator</artifactId>
</dependency>
After restarting your server, visit http://localhost:8080/actuator/health. You should see {"status":"UP"}, indicating that the Spring Boot server is functioning properly.
Spring Boot Actuator exposes several endpoints that provide insight and metrics about your application. However, by default, only a limited number of endpoints such as /health and /info are available.
To make all management endpoints accessible via HTTP, add the following configuration in your application.properties or application.yml:
management.endpoints.web.exposure.include=*
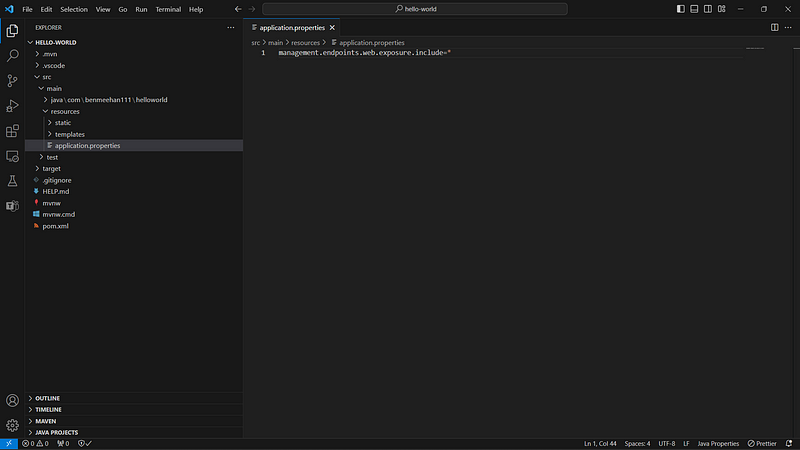
This configuration will allow access to all Actuator endpoints over HTTP.
Commonly used Actuator endpoints include:
- /auditevents: Displays audit information related to authentication and authorization.
- /beans: Lists all Spring beans in the application.
- /condition: Shows conditions for autoconfiguration matches or mismatches.
- /httptrace: Provides details about the last 100 HTTP requests.
- /mappings: Lists all URI mappings (e.g., @RequestMapping endpoints).
- /metrics: Lists valid metrics, accessible by appending their names to the URL.
- /shutdown: Allows graceful shutdown of the application (when enabled).
While this is beneficial for development and testing, avoid exposing these endpoints in production due to security risks.
Exploring Actuator:
To simplify the exploration of Actuator endpoints, you can add a HAL browser dependency to your pom.xml:
<dependency>
<groupId>org.springframework.data</groupId>
<artifactId>spring-data-rest-hal-browser</artifactId>
<version>3.3.6.RELEASE</version>
</dependency>
With the HAL browser, you can view Actuator endpoints through a web interface. Access the HAL browser at http://localhost:8080/browser/index.html. Type /actuator in the explorer, click "Go!", and you'll see all exposed Actuator endpoints.
This concludes the first part of this tutorial. In the upcoming sections, we'll delve deeper into the Spring-Web dependency and learn how to work effectively with databases in Spring Boot.
Enjoy your Spring Boot learning journey!
“Time is the only critic without ambition.” — John Steinbeck
Part 2 is Now Available Here
This video provides a comprehensive introduction to Spring Boot for beginners, covering the essentials and helping you get started with Spring Boot 3.
This crash course offers a deep dive into Spring Boot, guiding you through the setup and fundamental concepts needed for successful development.